

|
|
| |


 |
| |
Zebras and Societies are very healthy, hardy,
adorable finches that require minimal care.
I chose starting with them because of those reasons. They come
in many different
varieties and colors, and make excellent “starter birds”. This
web page will discuss
what you need to get started with these finches.
|
| |
The first thing you will need is a place to keep the birds.
The cage is very important.
The spacing of the bars should be ½” or less or the birds will
escape. Also birds fly
horizontally more than they fly vertically so it is more
important to choose a cage with
more length than height when making your selection. Most of the
cages sold in the “chain” pet stores for finches do not provide
enough horizontal flight room. A number of breeder use 26”x 18”x
18”
cages for keeping their zebras and societies. Personally I like
the 30” x 18” x 18” size
cage or larger, but either one will be large enough for the
birds to get the amount of
exercise they need to be healthy. I have also used 30” wide x 36” high
x 18” deep cages. These make excellent flight cages, but
the extra height is not strictly necessary. My experience has
taught me that I prefer the cage doors that slide up and down.
It is easier for me to
get things in and out of the cage. I’ve had one too many escapees
from cages that have doors that swing open. But many people really
like the swinging door over the sliding door.
There are many sources for good cages. The prices range
from reasonable to WOW! Because of the number of cages I
use, I am always looking for good quality cages at reasonable
prices. I have found that Ebay is an excellent source for
breeder cages. Another good source of cages
(including the larger flight cages) is
Country Feathers.

The next thing after selecting a cage is to look at the perches.
Most cages come with
what I call “pet shop” show perches. These perches are arranged
from side to side, one at the front and one at the
back of the cage, making it easier for people to see the birds
as they sit on the perch.
Perches of this type restrict the flight of the bird to the
depth of the cage for flight,
because the birds tend to fly from the perch to the front of the
cage and back again. You
can cut and notch the perches that come with the cage so that
they fit front to back in
the cage. You can also purchase wooden dowels of different sizes
at a craft or hobby
store and cut them to length. This arrangement encourages the
birds to fly from one side of
the cage to another, using the length of the cage to full
advantage. When placing the
perches in the cage you want to keep them more than 3 ½” away
from the sides so that
there is room for their tails without hitting the bars. Another
thing you may want to do is to place one perch toward the top of the cage and the other
one closer to the bottom
than the allowing the flight to be diagonal.
The perches that come with the cages are usually made of soft
wood. Soft wood perches have a slight disadvantage. That
disadvantage is that the bird’s nails do not have a hard enough
surface to help naturally trim their nails. So you will on
occasion have to trim their nails for them, (more so for society
finches than zebra finches). You can reduce the amount
of nail trimming by tossing those perches and doing one of two
things:
- Buying natural perches at the pet shop (which can get expensive)
- Cutting some branches ½” diameter or less from some trees. It is
important that these
trees must not have been sprayed with chemicals (fertilizer,
insecticide, fungicide, etc). After they have dried, they
need to be sealed. I have used clear nail polish for
this purpose, but you could also use a water based interior
sealer.
The varying sizes of the natural branches help to exercise
the finch’s feet, which is
good for them. However, if you chose to cut your own branches I
would soak them for at
least one hour in a 10% bleach and water solution and then air
drying them for at least
24 hours before using them. This way you will kill off any bugs
or germs that nature may
be hiding. The placement of the perches is more important then
the type of perches, which
you can change at a later date.
On my larger cages I have also made a “swinging perch” by
cutting a thick (7/8 or 1 inch)
dowel about 18 inches long and putting a coffee cup hook on one
end. We drilled three holes through the dowel and inserted some
smaller dowels in the holes, so they are at right angles main
dowel. Hooking it to the top of the cage it gives them a
series of staggered perches which swing.
 Homey Touches
When in the wild, these birds will often use the natural foliage
to hide from predators.
Although it is not strictly necessary, I have found that they feel more secure when they have some
foliage in the cage. I have
tried using real plants (spider plants were especially good for
this purpose) but the
birds did take a toll on the plants, and the clean up was
difficult. Finally, I settled
on artificial plants (leaves, vines, etc) that can be found at
any larger craft store.
This is not strictly necessary: the birds will be fine
without the foliage. However, it does help reduce stress
and as an added bonus it allows you to view them in a more
"natural" setting.
The birds also seem to be happier and feel more secure when they
are not totally in the open. You can achieve this by building
(or buying) a “box cage”, which is a solid box with the front
replaced by a normal bird cage front. However, I have achieved
the same effect on regular cages by covering the sides and back
with fabric. I attach the fabric to the top of the cage with
binder clips from the office supply store. In addition to
helping the birds to feel more secure, these fabric strips help
to contain the hulls and seeds that the birds scatter about.
They also help to keep the walls clean. They can
easily be thrown in the washer for a quick cleanup.
The next thing to look at about the cage is the food and water
dishes that come with the
cage. Most cages have what I call the “Letter D” cup shaped
dishes. You can use them, but they do have a disadvantage. Zebras and Societies love
to turn these seed
dishes into a nest and the water quickly becomes a bath and
“poop soup” and needs to be
changed a lot each day. I prefer to use a water fount that hangs
on the outside of the cage with a little finger sticking into the cage.
That little finger doesn’t
allow them to bath in their drinking water and reduces the odds
of it becoming a bathroom
for them, which of course means it reduces your work. Some
people have managed to train
their birds to drink from the water bottle that hangs of the
size of the cage. This is
even better if you can do it. The big trick with both of these
is to get the birds to
start drinking from them. To do that you will need to place a
water dish next to or under
the water founts until you see them drinking from the fount.
Also do not place them under
perches. Personally, I like to place them with a stone or small
rock under them so that
the bird hops up onto the rock to get its water. This also helps
to trim their nails. I also have found a covered water dish that
I put inside the cage which provides water without allowing them
to "dirty" their water. These dishes only need to be
changed once every two or three days.
For a seed dish I use anything from a plastic lid from a peanut
butter or mayonnaise jar
to the 2”clay flower pot bottoms. The thing you want to ensure
is that it is deep enough
to hold some seeds but not high enough for them to start
thinking about nesting in it.
Also you should ensure it is narrow enough to fit through the
cage door without spilling
the seeds. I have also used “hopper type” seed feeders. One type
I put inside my larger
cages is actually intended for wild birds outdoors. The other
hangs outside the cage
through an open door.
You should also have some type of bird bath for the cage. This
can be a deeper dish
filled with water inside the cage, or the type sold in pet
stores which “hang” in an open
door. I found that sometimes these types need to be slightly
modified to fit in some of
the smaller doors, depending upon your bird cage. This can be
easily done with a small
hobby saw or "X-acto" knife. My husband uses his Dremel Moto-tool to cut
them and it takes him
about five minutes from start to finish.
|
| |
 |
| |
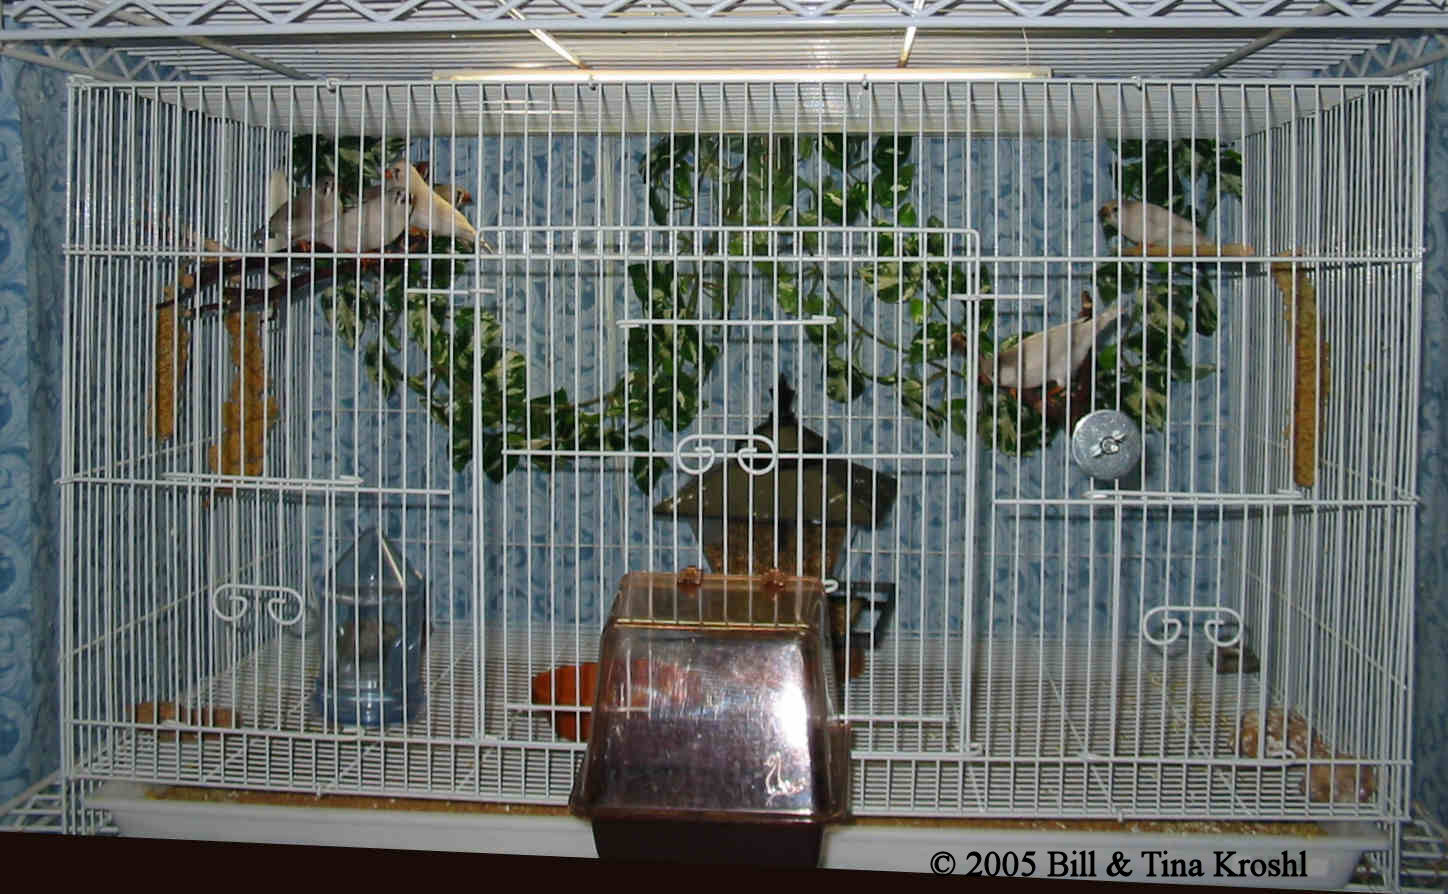
This photo shows an example of a cage holding several zebra
finches. Note the spray millet hanging on the left side of the cage.
You can also see the covered water dispenser (the clear cylinder
with the conical top at the left side of the cage). The
gravity seed feeder, designed as a yard feeder for wild
birds, is located inside the cage. |
| |
|
| |
 |
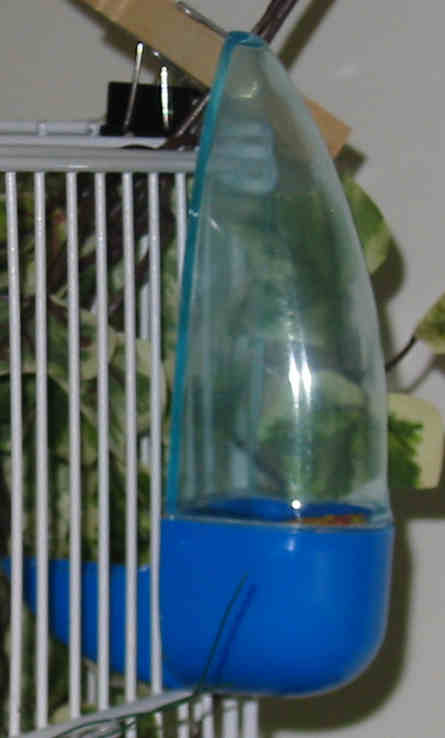
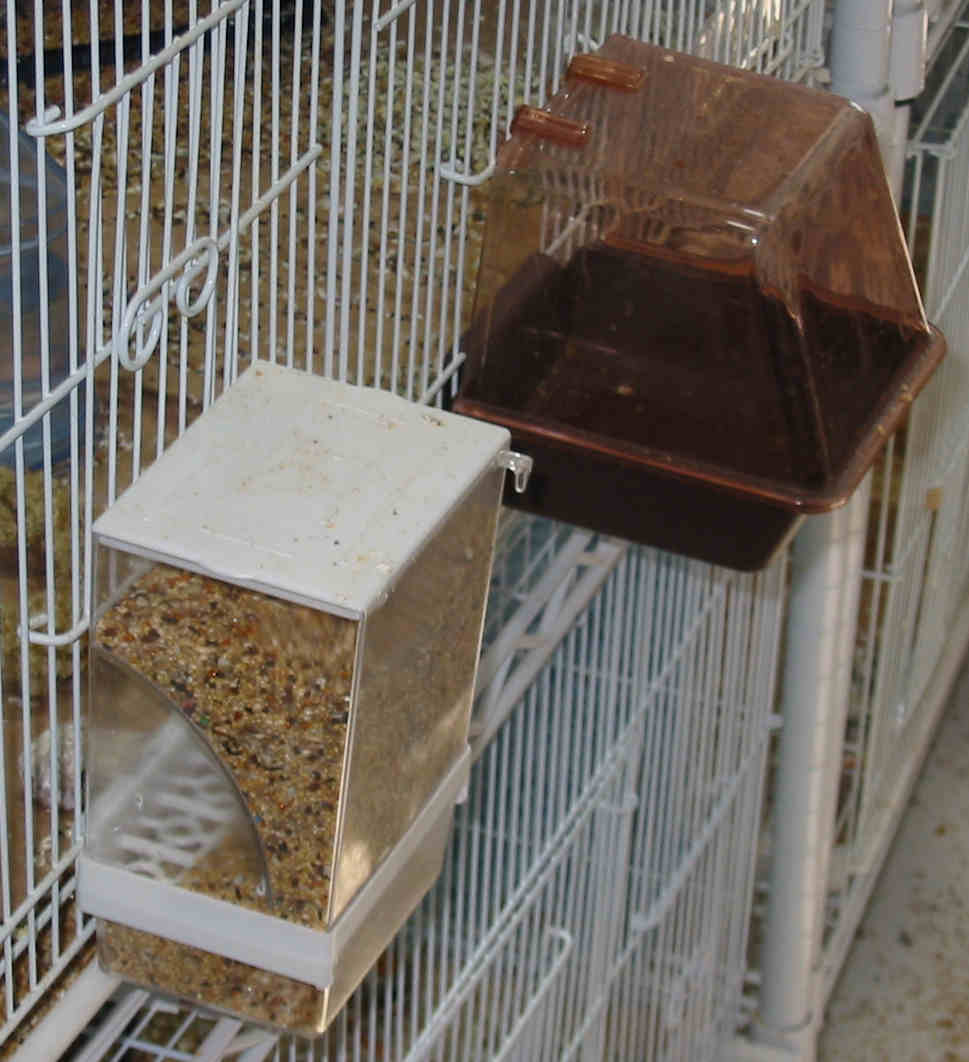
Left: Water dispenser that hangs on the outside of
the cage.
Right:
Seed hopper feeder hanging outside the cage.
Also shown is a bird bath hanging outside the cage. |
 |
|
| |
 |
| |
I have seen many web pages devoted to the proper feeding of
finches. There are many different schools of thought, and it can
be very confusing. In this section I am going to talk about the
“bare minimum” for getting started, and the foods that I use. I
also want to be clear that I do not have any financial interest
in any of these companies or products, nor do I sell any bird
products (although I do sometimes sell some of the birds I
breed).

Basics
For bird seed many pet stores carry a lot of different brands of
finch seed. Any of those will be fine for the birds. Just make
sure that is for finches and softbills. In an emergency, you can
use canary seed. However, the seeds marketed for hookbills are
too hard for the finches to crack open and eat. There are also
pellet foods available. Some people report great success with
these diets. I tried one of them for my finches, and most of my birds would not
eat them. Those that did exhibited excessive flatulence (yes,
birds can do that).
To many new owners it looks like the birds waste a lot of seed or
that they have a full dish. Zebras and Societies, along with
many other finches remove the hulls off the seeds before they
eat them. They will dump the hulls anywhere including back in
the dish. So don’t be fooled into thinking the dish is full of
seeds when it is full of hulls. Finches can starve to death this
way. In fact, a finch can starve to death in as little as 36
hours. This can occur even if food is available if they
don't recognize it as food. This might occur if you took a
finch who was used to eating seeds and just gave it a pellet
diet. One thing I do once a day is to hold the seed dish in a
brown paper lunch bag and gentle blow over the dish. The hulls
will fly into the bag and the seeds will remain. This way I will
see how much I need to refill the dish. For more information
about seed mixes and food in general, you can look at my page on
Feeding Finches.
The next thing you need before you bring the bird home is a
cuttlebone and a small dish to hold some oyster shells. These
are good sources of calcium, which is especially important for
hens when they are laying eggs. They also like spray millet,
which you should be able to get at any pet store. My birds eat
spray millet like it was candy. I attach one or two sprigs of
spray millet to the inside of the cage. You can buy special
holders at the pet store, but I have found that spring
clothespins work just as well. Zebras and societies also like a
variety in their diet. You may want to try some veggies like
peas (without their shells), carrots, and romaine lettuce. But
remember they are mostly seed eaters so only give them a small
amount. Some times the bird has been raised on seed and after
offering it several times they just won’t try it. Zebras and
Societies do not need insects, mealworms or other live food.
I have another section of this website that talks about
finch nutrition in more detail.
|
| |
Now that the cage is ready it is time to select the birds.
Both zebras and societies are social finches and you will need
to start with at least two of them. Societies are hard to sex by
looking at them. You need to watch and study their behavior. The
male will puff himself up and sing. He even does a little dance
when singing if he is trying to attract a female. The female
will occasionally chirp but not very often. However, do not be
fooled as I was when I was purchasing my first pair. The
dominant male sang and the other one was very quiet so I thought
I had a pair. It wasn’t until a few weeks later when I gave them
a nest that I found out differently. The dominant male built the nest and flew
up to the top perch and started to sing his heart out to the
birds outside after he finished working on the nest. The next
day the other one started working on the nest. I thought she was
just putting her finishing touches on the nest before accepting
it. Low and behold after she/he finished he flew up to the top
perch and started singing to the birds outside. What a
surprise! But that is okay because two male societies can get
along very nicely. I have a section of my site devoted to
Society Finches. Another great source
of information is Efinch.com.
Zebra finches are fairly easy to sex. A male usually has cheek
patches that are either orange, black, gray or fawn colored.
They have horizontal black and white stripes from the bottom of
the beak to the beginning of their belly. They have chestnut or
black flanks with white spots. A hen will not have these except
for the black, gray, or fawn cheek hens. Both have a tear mark
that is usually black just behind the eyes and dark black, fawn
or gray tails with white bars. Zebras come in many color
mutations. The most common are the gray, fawn, and white with
chestnut flanks. If you select a pair – 1 male and 1 female they will be
fine all by them selves. If you decide to have a unisex
cage, I recommend that you get at least three zebras of the same
sex. Pairs of same sex Zebras usually do not get along. I also
have a Zebra section on this website with more information.
As with the Society finches, I recommend
Efinch.com for more
detailed information, as well as the Zebra
Finch pages on my website.

There are many different sources to buy birds. Pet stores often
have a bird section, and they may have finches for sale. My
first pair came from one of the large chain pet stores. If you are
looking for a special type of finch, your best bet will be from
a breeder in your area. They can often be found through local
bird clubs. In our area the bird shows usually include a sales
area where people bring birds and accessories for sale. The
costs of buying birds at a “bird mart” in a show are often
comparable or even less expensive than buying them from a pet
store. In my experience, you quite often get a better
quality bird and more varieties from which to make your
selection if you purchase at a bird fair or mart, or directly
from a breeder.
A final word:
Zebras and Societies are very easy keep and maintain. Their
requirements are minimal and they will provide hours of
enjoyment with their antics and their singing. Take the plunge
and start with a pair: you won’t regret it.
 |
| |
|
|
|
|
|
|
| |
|
|
|
|
|
|
| |
|
|
|
|
|
|
| |
|
|
|
|
|
|
| |
|
|
|
|
|
|
|


